
[Introduction Summary] Virtual production is no longer just a showy buzzword from promotional videos; it is actually the engineering answer that inevitably emerged when post-production compositing work was moved forward to the shooting set. When post-production compositing is compressed into an extremely short cycle, the first question creators face is often not which software to use, but which technical route to choose: set up a green screen, or build an LED wall? The difference between the two goes far beyond budget level—it directly determines where the light comes from, what the actors can see, and how much room there is for rework in post. This article does not discuss concepts; it only discusses selection criteria, cost structures, and the pitfalls most easily encountered in real engineering.
I. Why Virtual Production Has Moved from a Bonus to Infrastructure
Over the past decade, the production cost structure of film, television, and commercial content has undergone a change that is not easy to notice. Actor schedules are getting more expensive, venue rentals are getting more expensive, and the most uncontrollable factor is post-production: after a shot is completed in front of a green screen, you have to wait three weeks to find out that the background lighting position is wrong, and reshoots mean gathering everyone again. Virtual production solves exactly this misalignment—it moves the answer to “what this shot will ultimately look like” from the post-production suite back to the shooting set.
The specific benefits can be broken down into three layers.
The first layer is the reduction of decision-making costs. What the director sees on the monitor is close to the final image; composition, lighting ratio, and depth of field can all be adjusted on the spot, without needing to imagine a city in front of a green screen.
The second layer is the improvement of actors' performance quality. The environment the human eye sees changes body language. Standing inside an LED cyclorama surrounded by a real city nightscape, the actor's gaze, blocking, and emotional feedback are a different matter from facing a green cloth.
The third layer is the compression of rework volume. In traditional workflows, three types of problems—keying edges, lighting position matching, and missing reflections—often only surface at the compositing stage, while real-time compositing moves these judgments forward by several weeks.
Only by understanding these three layers of benefits can one understand why selection is not a purely technical issue: what you are buying is not a screen or a green cloth, but the ability to “know the result in advance.” And the price of this ability differs several times between the two routes.
II. The Underlying Difference Between the Two Routes: Where the Light Comes From
Reducing the difference between green screen and LED wall to virtual versus physical is a common misunderstanding. There is only one real watershed: is the ambient light captured by the camera added in post, or does it exist on set?
The essence of the green screen route is replacement. What the camera captures is an evenly lit green background, and environmental information is completely absent at the shooting stage. All the light on the actors comes from on-set lighting fixtures, and the background's color temperature, direction, and intensity all have to be added in post during compositing. This route offers extremely high freedom—the background can be anything, and modifications are just changes to project files. But the cost is that all lighting relationships need to be manually reconstructed; once they are inaccurate, the characters will float on the image like stickers.
The essence of the LED wall route is presentation. The environment is rendered by a real-time engine and displayed directly on the screen body, which itself is a huge, luminous, colored light source. The cool light on the actors' faces, the reflections on the edges of their clothing, and the highlights in their eyes all come from the real environment. What the camera captures is already-composited light. This route has extremely strong physical realism, but its freedom is limited by the size of the screen body: once the camera pans beyond the screen boundary, the virtual world breaks off.
To summarize in one sentence: green screen brings post-production to the set to do the work, while LED brings rendering to the set to emit light. The former solves whether it can be done; the latter solves whether it looks real.
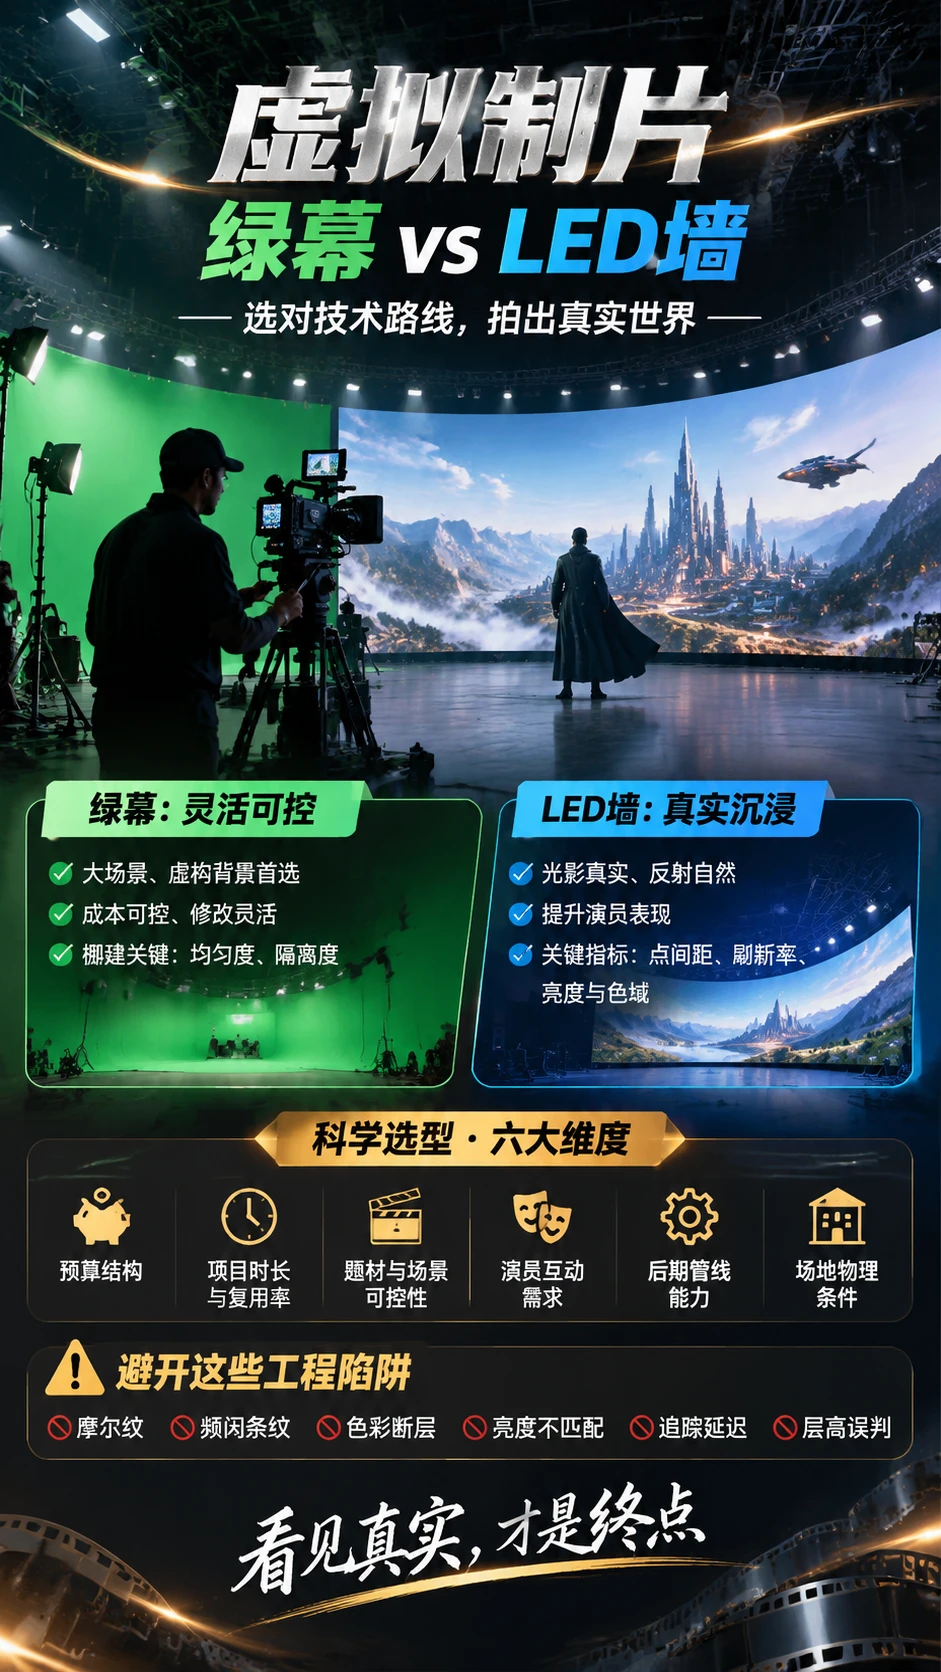
III. The Green Screen Route: The Most Mature, and Also the Most Easily Underestimated
Green screen is often regarded as a low-spec solution, which is the most widely circulated prejudice in the industry. In fact, most large-scale projects among domestic and international series still heavily use the combination of green screen plus real-time compositing, for a simple reason: wide subject range, scenes that need to be completely fictional, and budgets that need to be controllable.
The criteria for judging applicable scenarios are actually quite clear. When a project meets any two or more of the following, green screen is usually the better solution: scenes requiring extensive replacement or construction from nothing; long shooting cycles with a large number of shots; scenes requiring frequent changes; insufficient stage height or limited load-bearing capacity; budgets that cannot support screen body investment.
The key to stage construction is not the green screen cloth, but three indicators that are not easy to see directly.
First, uniformity. The core of a green screen is not green, but consistency. Industry experience is that the illuminance difference between any two points on the entire screen cloth should be controlled within half a stop of exposure for clean keying. For this, at least two rows of soft lights are needed to illuminate the background at a 45-degree cross angle, rather than simply setting up two lights in front of the screen.
Second, isolation. The distance between actors and the green screen is recommended to be kept at least 1.5 meters to avoid green reflection contaminating skin and clothing edges. If the floor is also green, a floor mat of the same color code as the background needs to be laid under the actors' feet, and the seams must be ensured to be inconspicuous.
Third, switchability. A mature green screen stage usually uses double-sided floor mat, with one side green and the other white or gray, so that the same venue can switch between three modes: green screen, solid-color background, and practical set construction. For medium-sized stages undertaking different types of projects, this directly determines venue utilization.
On the cost level, for the renovation of a small-to-medium green screen stage of 200 to 400 square meters, including lighting fixtures, floor mat, screen cloth, and basic acoustic treatment, the domestic reference range is approximately 300,000 to 800,000 RMB; if merely renting an existing stage, the daily price is roughly between 5,000 and 20,000 RMB, depending on the lighting configuration and whether technical support is included.
IV. The LED Wall Route: Turning the Set into Something That Emits Light
The value of the LED route lies not in the screen itself, but in the fact that it simultaneously serves three roles: background, light source, and reflection source. This is the part that green screen can never replace.
Among screen body parameters, four items truly affect final image quality.
Pixel pitch determines the minimum shooting distance. P1.5 to P2.6 is currently the mainstream range for virtual shooting; the smaller the pixel pitch, the closer the camera can get without visible pixel graininess. The empirical formula is: the minimum shooting distance is approximately 1.2 to 1.5 times the screen body height; below this distance, the LED lamp bead structure of the screen body will expose grid patterns in shallow depth-of-field images.
Refresh rate determines flicker. For conventional shooting, 2400Hz is sufficient, but as soon as high-speed shots are involved, it must go up to 3840Hz or even 7680Hz. The judgment criterion is direct: set the shutter speed to 1/1000 second and shoot a clip facing the screen; only if there are no horizontal rolling bands in the image does it meet the standard.
Brightness determines the controllability of lighting ratio. Virtual production screen bodies usually require adjustable 1500 to 2000 nits, and need to be capable of stepless adjustment either by zone or as a whole. If the screen body is too bright, the background will overpower the people; if too dark, it cannot provide effective lighting for the actors. In actual shooting, dynamic adjustment is often needed according to shot size.
Grayscale and color gamut determine dark-area detail. 16-bit grayscale and DCI-P3 color gamut coverage are the baseline; otherwise, night scenes and smoke-type scenes will show obvious color banding.
In terms of rendering architecture, LED shooting relies on frustum layering. The portion within the camera's field of view uses high-precision real-time rendering to ensure correct perspective and rich detail; the peripheral area outside the field of view is filled with low-precision environment maps or simplified geometry, only to provide correct reflections and illuminance without consuming too much computing power. This mechanism is driven in real time by the movement of the tracked camera, and tracking latency and rendering frame rate must be strictly aligned; otherwise, there will be a sliding sensation where the image on the screen lags half a beat behind the camera.
Synchronization is another engineering point that is easily overlooked. The camera, screen body control system, and rendering host must all share the same tri-level sync signal; otherwise, different refresh phases will superimpose rolling bands on the image. This is not a software setting issue and must be solved with a hardware sync distributor.
On the cost level, for a self-built LED virtual stage of around 200 square meters, including screen body, structure, rendering workstations, tracking system, and power distribution and cooling, the domestic reference range is roughly 2 million to 6 million RMB; renting an existing stage costs about 30,000 to 80,000 RMB per day, usually including technical support and basic scenes.
V. Six Dimensions of Selection
Technical routes have no absolute superiority or inferiority, only degree of match. When making decisions, scoring item by item according to the following six points usually leads to a clear conclusion.
First, budget structure. LED is a one-time heavy investment with low marginal cost, suitable for high-frequency reuse; green screen is low-threshold entry with per-project costs rising with man-hours, suitable for project-based operation. If you only shoot two or three projects a year, renting an LED stage is usually more cost-effective than building your own.
Second, project duration and reuse rate. Only when more than 15 shots are filmed on the same stage in a day can LED debugging costs be amortized; if a project has only a few shots, the time spent debugging the screen body and frustum may be longer than the shooting itself.
Third, subject matter and scene controllability. For completely fictional subjects requiring extensive visual effects replacement, green screen is more flexible; for realistic cities, natural landscapes, and subjects requiring real reflections, LED has obvious advantages.
Fourth, interaction needs between actors and props. When actors need to react to a specific environment and props need to produce real reflections, LED is almost the only solution.
Fifth, post-production pipeline capability. The success of the green screen route depends largely on the level of the post-production team; if post-production resources are weak, LED can instead reduce overall risk.
Sixth, physical conditions of the venue. LED has far higher requirements for ceiling height, load-bearing capacity, power supply, and cooling than green screen; venues with a ceiling height of less than six meters basically cannot support effective shooting.
VI. Hybrid Work: The Real Industry Answer
Mature projects rarely make single-choice decisions. The three most common hybrid approaches are worth mastering.
The first is LED for close-ups plus green screen for long shots. Close-ups of actors are shot in front of the screen to ensure real facial lighting and reflections; medium and long shots switch to shooting in front of a green screen, with the background rendered using the same virtual scene set, and finally unified at the compositing stage. This achieves both the realism of light and breaks through the physical size limitations of the screen body.
The second is using LED only as a light source. The screen body is used as a giant softbox, playing an environmental panorama or solid-color gradient, while the actors actually stand in front of a green screen, but the light on them comes from the screen body. This approach is very practical in small and medium stages where a complete cyclorama cannot be built.
The third is zoned shooting and shot grading. Shots are ranked by sensitivity to realism; high-sensitivity shots use LED, low-sensitivity shots use green screen, concentrating the budget on the places where the audience will truly be staring.
VII. Engineering Pitfall Checklist
The following six types of problems recur in actual projects, and most are discovered only after shooting begins.
One, moiré patterns. Produced by mutual interference between the screen body's pixel grid and the camera sensor's sampling. Mitigation methods include reducing shutter angle, adding an optical low-pass filter, increasing shooting distance, and adjusting the screen body's scanning method; usually a combination is needed rather than a single method.
Two, flicker and rolling bands. Mostly caused by insufficient refresh rate or missing sync signals; first check whether a unified sync source is connected, then consider increasing the refresh rate.
Three, color management discontinuity. The screen body's factory color, rendering output color, camera Log curve, and on-set monitoring standard must all be unified onto the same chain. A common mistake is adjusting on set according to the monitor, only to discover in post that the footage does not match the screen body's color gamut.
Four, brightness mismatch. When the screen body brightness is too high, actors' faces appear dim and oppressive, looking as if the people have been swallowed by the background. The correct approach is to let screen body brightness serve the actors' lighting, rather than pursuing a transparent and bright image.
Five, tracking and rendering latency. Tracking data travels over the network, and rendering has a fixed frame cycle; the two叠加 will produce lag. It must be aligned through frame-by-frame clapperboard marking, not adjusted by feel.
Six, misjudgment of ceiling height and screen distance. Many venues meet requirements on paper, but during actual shooting it is found that the camera cannot retreat to the minimum distance, resulting in screen body grid patterns throughout the image. Before shooting, be sure to conduct a distance test with the actual lens.
VIII. Conclusion
The debate over virtual production technical routes is essentially a question of which stage to place uncertainty in. Green screen leaves uncertainty to post-production, trading flexibility for cost elasticity; LED places uncertainty in the pre-shooting debugging period, trading upfront investment for on-set certainty. Neither is the endpoint; the true endpoint is to let creators know what the image will ultimately look like before they press the record button.
As real-time rendering, markerless tracking, and neural rendering technologies continue to mature, the boundary between the two routes will blur further. But the judgment criterion will not change: where the light comes from is where the audience will believe is real.

 简体中文
 English