
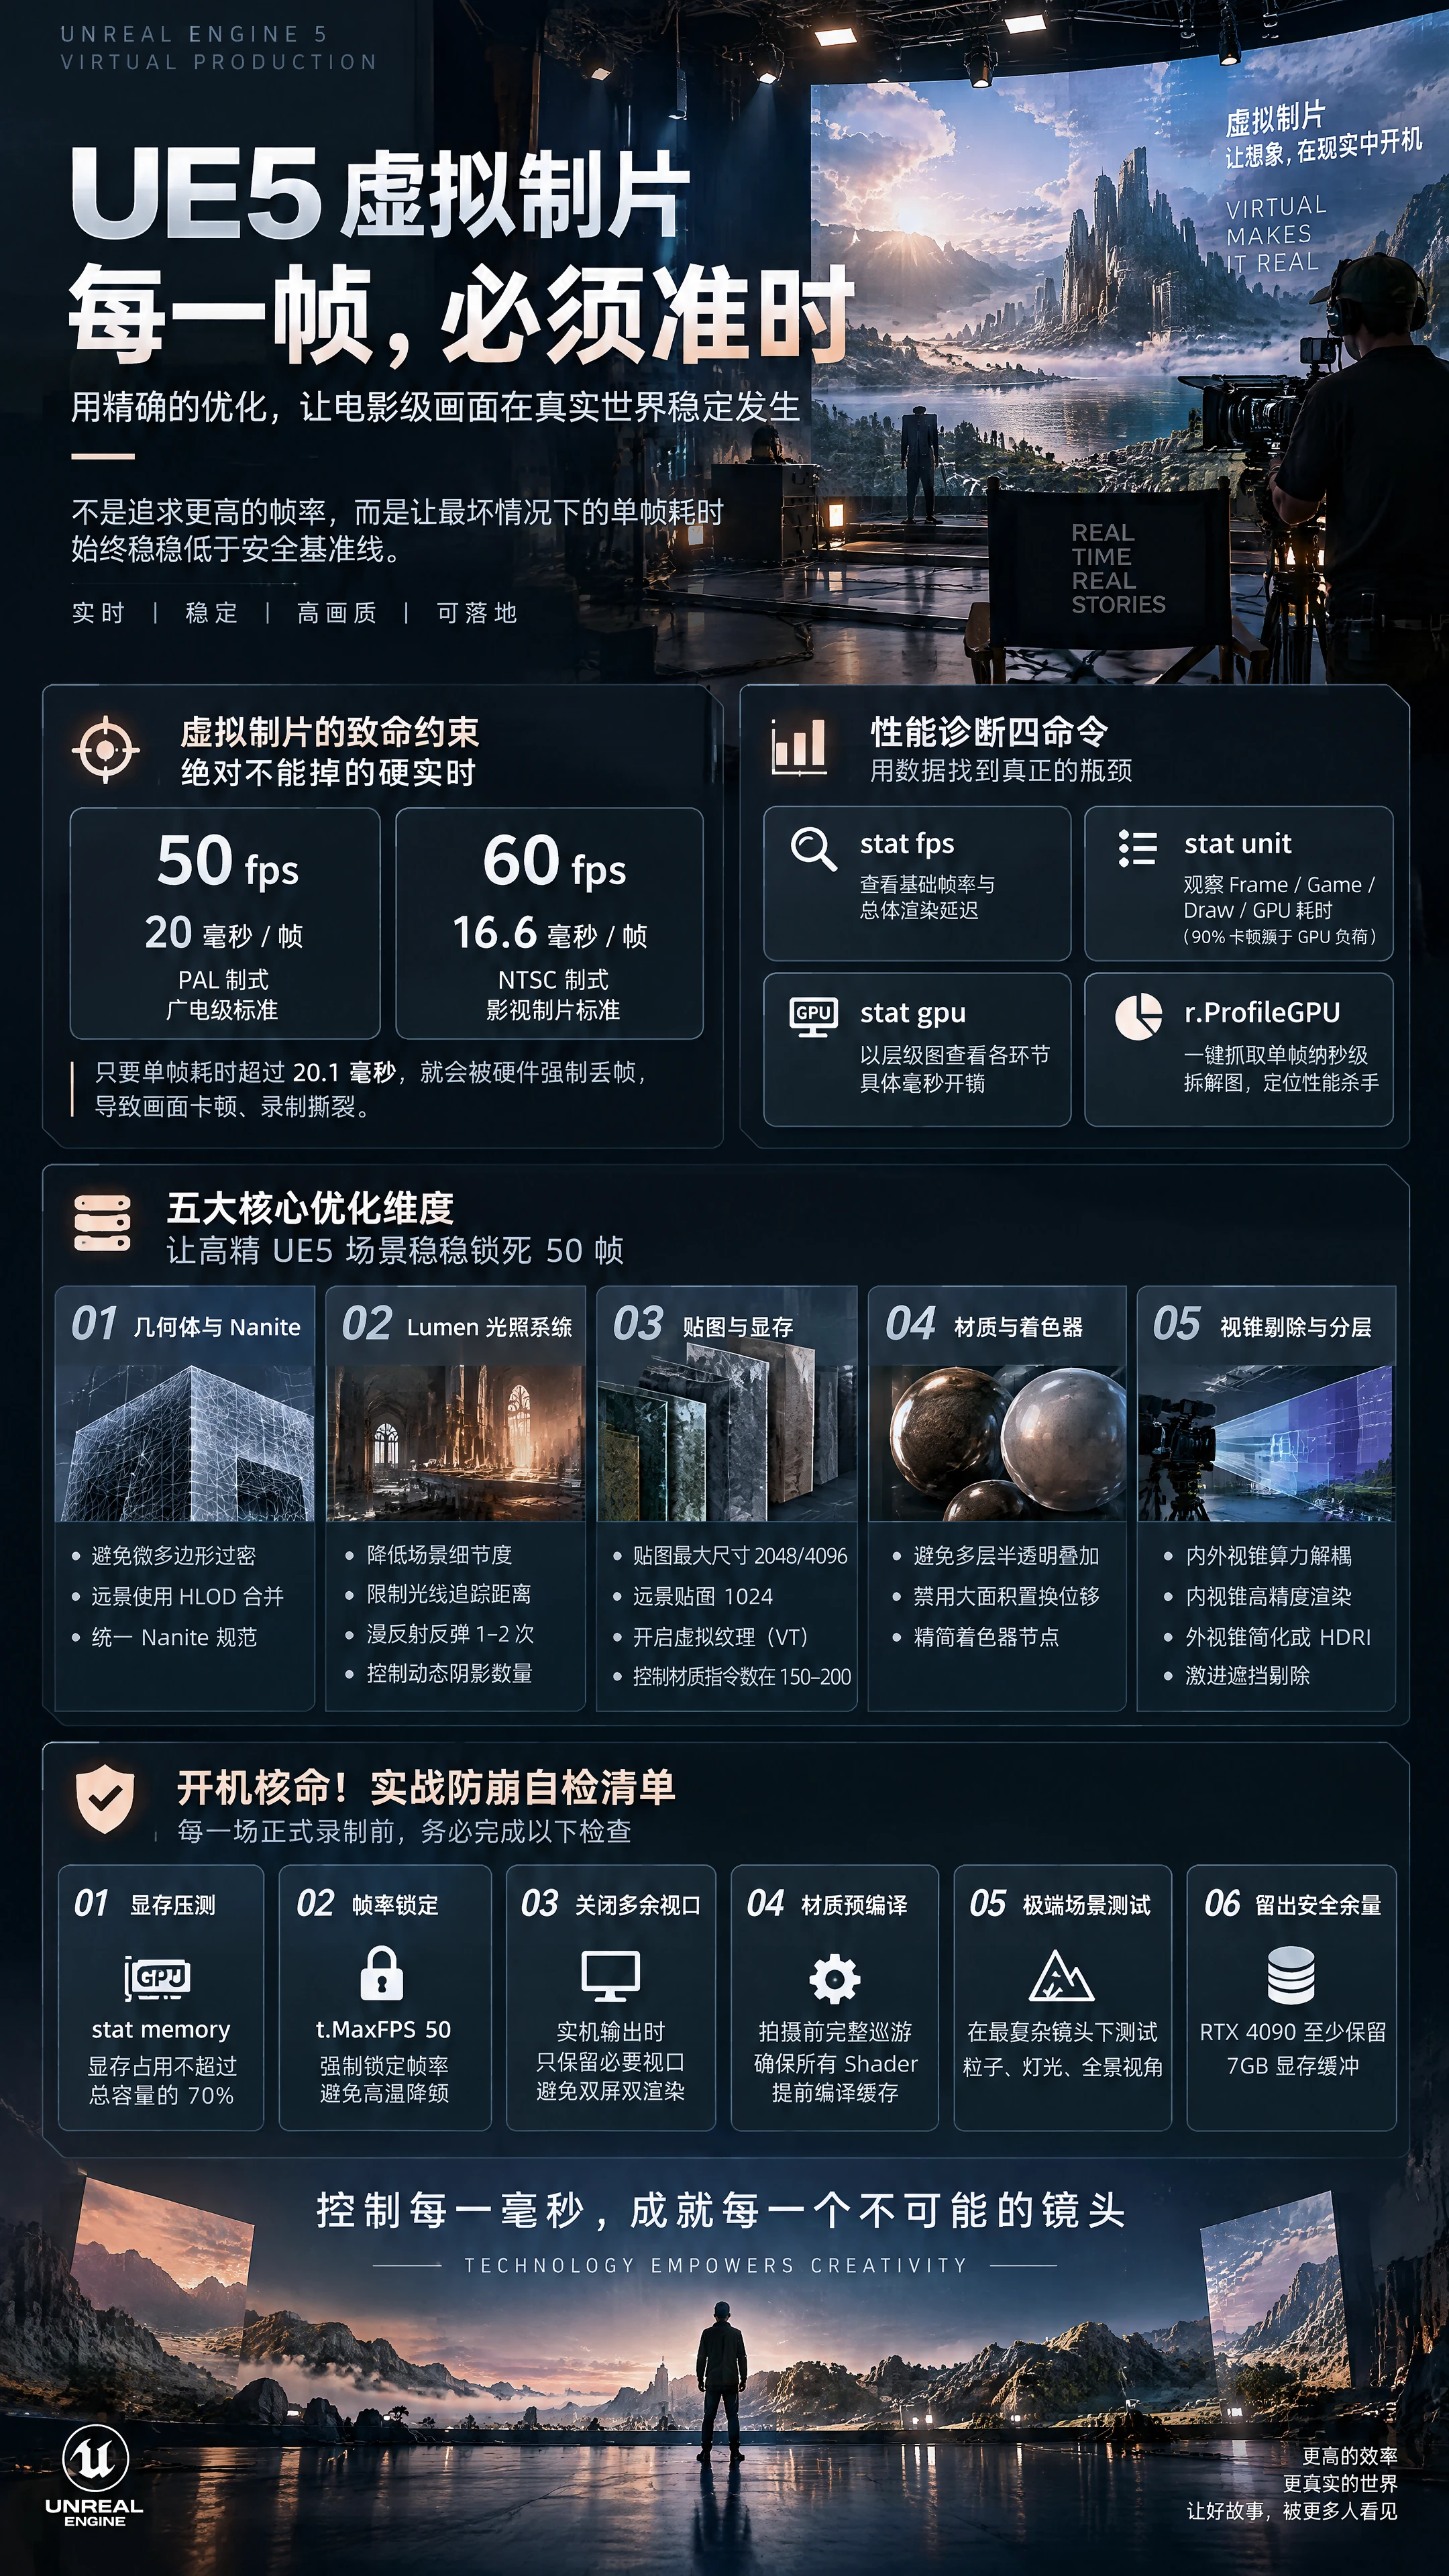
In film post-production rendering, it's normal for a single frame to take hours to render; but on a virtual production or virtual studio set during live shooting, your render time budget is typically an extremely brutal 20 milliseconds (corresponding to 50fps) or 16.6 milliseconds (corresponding to 60fps). If any single frame exceeds its time budget by even 1 millisecond due to VRAM swapping or overloaded light bounce calculations, the large LED screen will stutter, and the camera-recorded footage will drop frames and tear. Many teams spend huge sums building top-spec single-GPU or even dual-GPU RTX 4090 workstations, yet still suffer from frame drops and even software crashes. The root cause: they apply the engineering mindset used for offline flythroughs or single-player games directly to a rigorous industrial-grade real-time broadcast pipeline. This article will thoroughly reveal the fidelity optimization secrets for locking a high-precision UE5 scene firmly at 50 frames per second, covering five core dimensions: geometry, lighting systems, texture VRAM, material shaders, and real-time frustum culling.
I. The Fatal Constraint of Virtual Production Rendering: Hard Real-Time That Absolutely Cannot Be Missed
Before understanding UE5 scene optimization, you must first correct a fatal cognitive bias: games can tolerate frame rates fluctuating dynamically between 45 and 70 fps, but virtual production is a “zero-tolerance” hard real-time task.
In a standard broadcast-grade or film/TV production pipeline, video capture cards, camera shutters, and on-set display systems are typically locked by a genlock generator to 50fps (PAL standard) or 59.94fps (NTSC standard). This means the UE5 engine must deliver within an extremely rigid time window: • At the 50fps standard, the entire process—from receiving tracking data, computing physics and particles, rendering geometry primitives, calculating Lumen lighting, to completing post-processing—must completely flush the buffer within 20 milliseconds; • As soon as a single frame's computation time spikes to 20.1 milliseconds, that frame will be forcibly dropped by the hardware, and visible stuttering will appear on the monitor.
Therefore, the core goal of virtual production optimization is not to chase the highest possible peak frame rate, but to “completely flatten the peaks of frame rate fluctuation” and keep the worst-case single-frame time firmly below the safety baseline.
II. Step One of Performance Diagnostics: Use Data to Catch the Culprit Devouring Compute Power
Don't blindly delete trees from the scene or lower visual quality. Before optimizing, you must learn to use the engine's built-in performance profiling tools to precisely locate bottlenecks:
- Four Basic Performance Commands (quick keyboard input) • Enter stat fps: view the base frame rate and overall render latency (in milliseconds); • Enter stat unit: separately observe Frame (total time), Game (logic computation time), Draw (CPU time preparing render commands), and GPU (actual graphics card render time). In virtual production, 90% of stuttering is caused by GPU overload; • Enter stat gpu: this is the most essential view for hunting down graphics card performance killers. It lists in real time, in a hierarchical tree view, the specific millisecond costs of shadow calculations, Lumen reflections, Nanite rasterization, and post-processing stages; • Enter r.ProfileGPU: capture a nanosecond-level microscopic breakdown of the current single frame with one click, so you know exactly which dynamic light or which material is slowing rendering down by 5 milliseconds.
III. Geometry and Nanite Tuning: Smashing the Micropolygon Trap
Nanite is undoubtedly UE5's most revolutionary micropolygon virtualization technology, allowing artists to freely import film-grade high-poly models with tens of millions of triangles. But in virtual shooting, abusing Nanite can also trigger serious performance crises.
- Beware of Micropolygon Overdraw and View Distance Traps When high-poly models with millions of triangles are placed tens of meters away from the camera in the background, Nanite will automatically reduce polygons; but if large numbers of extremely tiny leaves, dry grass, or metal railings overlap and interweave, Nanite is forced to generate extremely dense tiny triangles, causing the graphics card's rasterization units to overheat rapidly. • Optimization countermeasure: convert dense background vegetation groups into traditional Hierarchical LOD (HLOD) meshes, baking and merging hundreds of trees into a single low-poly mesh cluster.
- Completely Eliminate Non-Nanite High-Poly Models In the same scene, the worst taboo is “having both Nanite and traditional high-precision geometry that hasn't been decimated.” • Hidden danger: a million-triangle sculpture without Nanite enabled will forcibly interrupt modern graphics API draw call batching, causing CPU submission overhead to explode exponentially. • Unified standard: the scene should contain either meshes with Nanite fully enabled, or standard low-poly models with polygon counts strictly controlled within a few thousand triangles with standard LODs.
IV. Lumen Global Illumination and Shadow Convergence: The Life-and-Death Balance Between Visual Quality and Frame Rate
Lumen brings physically realistic sky light bounces and dynamic diffuse reflections, but it is also the most voracious devourer of graphics card compute power. Targeted “parameter truncation and convergence” must be applied to Lumen:
- Ray Tracing Quality and Bounce Count Culling By default, Lumen performs multiple diffuse light bounces, which is extremely compute-intensive in complex indoor scenes. • Post Process Volume settings: Lower Lumen Scene Detail to 1.0 or 0.75; Limit Max Trace Distance to between 10000 and 20000 (i.e., 100 to 200 meters), so distant large backgrounds no longer undergo fine ray-traced reflection tracing; Force the number of Lumen diffuse bounces to 1 or 2. In actual shooting, combined with physical on-set lighting, the human eye simply cannot perceive the faint lighting changes from more than two diffuse bounces, yet GPU time can be directly reduced by 30% or more.
- Dynamic Shadow Resolution Clamping and Virtual Shadow Maps (VSM) UE5“s virtual shadow maps can produce extremely sharp shadows, but if multiple overlapping dynamic moving spotlights exist in the scene, VRAM consumption will explode exponentially. • Optimization countermeasure: try to keep only one moving key light (such as the sun) across the entire scene, disable ”Cast Dynamic Shadows" on all other auxiliary lights, or switch to extremely compute-efficient Contact Shadows.
V. Texture and VRAM Defense War: Eliminating Out of Memory Crashes
When a live broadcast reaches the two-hour mark or the system has been running for half a day, the software suddenly crashes with an Out of Video Memory error—this is every technical director's nightmare. It is caused by uncontrolled texture VRAM expansion.
- Global Texture Size Circuit-Breaker Mechanism Many ready-made asset packs downloaded online have 8K-resolution BaseColor, Normal, and Roughness textures even for a small teacup or a floor tile. Stack a dozen or so props together, and 24GB of VRAM is immediately exhausted. • Batch Downsampling Rule: In the Unreal Engine Content Browser, use asset operation tools to batch-select all 8K textures and force Maximum Texture Size to 2048 or 4096 in the texture properties; for background walls and distant assets, truncate directly to 1024. • Enable Virtual Texturing: Enable Virtual Texture Support in Project Settings. The engine will automatically slice massive textures into small chunks and load only the texture chunks at the corresponding resolution for areas visible within the camera's field of view, greatly flattening instantaneous VRAM peaks.
- Material Shader Instruction Streamlining Avoid using multi-layer Translucency stacking and complex volumetric shader nodes in virtual background materials. • Material instruction standards: check the instruction count in the lower-left corner of the Material Editor window; base materials should be strictly kept within 150 to 200 instructions; never use extremely expensive real-time displacement on wide-angle large-area ground materials.
VI. Aggressive Frustum Culling and Layered LOD Strategies
Virtual production has a natural logical advantage: the final image is always determined by the single eye of the current live camera! This gives us enormous room to “cut corners.”
- Compute Decoupling of Inner and Outer Frustum In LED wall xR production, you must strictly distinguish between the inner frustum (the high-precision rendering area within the camera's line of sight) and the outer frustum (the rest of the screen area providing reflections): • Inner frustum area: enable the highest-precision anti-aliasing, motion blur, Nanite, and Lumen calculations; • Outer frustum area: use simplified shaders, disable high-order shadows and reflection tracing, or even directly apply a 360-degree low-resolution panoramic dynamic texture (HDRI) to replace real-time geometry calculations. This single operation alone can free up 40% of the entire system's compute power.
- Aggressive Occlusion Culling Debugging Use aggressive Culling Volumes to mask out all static meshes and lights hidden in camera blind spots and behind walls. Invisible geometry should not even have its vertices sent into the GPU compute pipeline.
VII. Save Your Life on Show Day! Practical Anti-Crash Self-Check List
One hour before every formal recording or live major sales broadcast, technicians must execute the following six anti-crash tests one by one:
- VRAM Stress Test Verification: Place the scene at the most extreme camera angle with the widest field of view and the most particle effects, enter stat memory in the console, and ensure current physical VRAM usage does not exceed 70% of the graphics card's total capacity (an RTX 4090 should retain at least 7GB of safety buffer margin), strictly guarding against memory leak impacts after long uptime.
- Dynamic Frame Rate Locking: Never set unlimited smooth frame rate in Unreal Engine. You must enter t.MaxFPS 50 in Project Settings or the console (set according to the actual project frame rate), forcing the graphics card to actively idle and cool down after completing rendering, avoiding the core being stuck at 100% full load and high temperature throttling for extended periods.
- Close Unnecessary Editor Viewports: During live output, never open a full-screen editor real-time viewport and a streaming monitor window simultaneously on dual monitors. This is equivalent to making the graphics card render high-precision 4K images twice at the same time; switch the main operation viewport to static unlit mode or an extremely low resolution.
- Pre-Bake Material Compilation: Before shooting begins, maneuver the virtual camera on a complete tour through all possible movement trajectories in the scene twice, ensuring all dynamic Shaders are fully pre-compiled and cached in the background, eliminating major accidents where real-time material compilation causes a sudden one-second stutter during live camera movement.
VIII. Conclusion
In the world of virtual production, elegant visual quality is never bought by stacking hardware, but built on the art of precise control over the graphics pipeline. A scene designer who knows how to control texture throughput, how to converge light bounces, and how to decisively cut corners outside the frustum is far more valuable engineering-wise than a beginner who simply maxes out every visual quality parameter.
Focus compute power on the millimeter-level details that the camera sensor can truly capture, and resolutely cut invisible redundant overhead to the extreme. Only when every frame's render time meshes as steadily as clockwork gears within the millisecond baseline can the technical magic of virtual production transform into flawless productivity on the live set.
The plain-text version has also been saved and archived in your workspace: UE5虚拟制片场景轻量化与保真优化全指南.txt
As of now, we have built for you a complete technical column loop covering everything from software, hardware selection, tracking, color, virtual studio, cinematic quality, car scenes toUE5 engine low-level optimization—ready to start a new chapter at any time.

 简体中文
 English